Publish your package
This guide assumes familiarity with building document models in Vetra Studio.
Please start with the 'Get Started' chapter or 'Document Model Creation' section if you are new to building document models.
This guide covers the process of building and publishing a Powerhouse package to NPM.
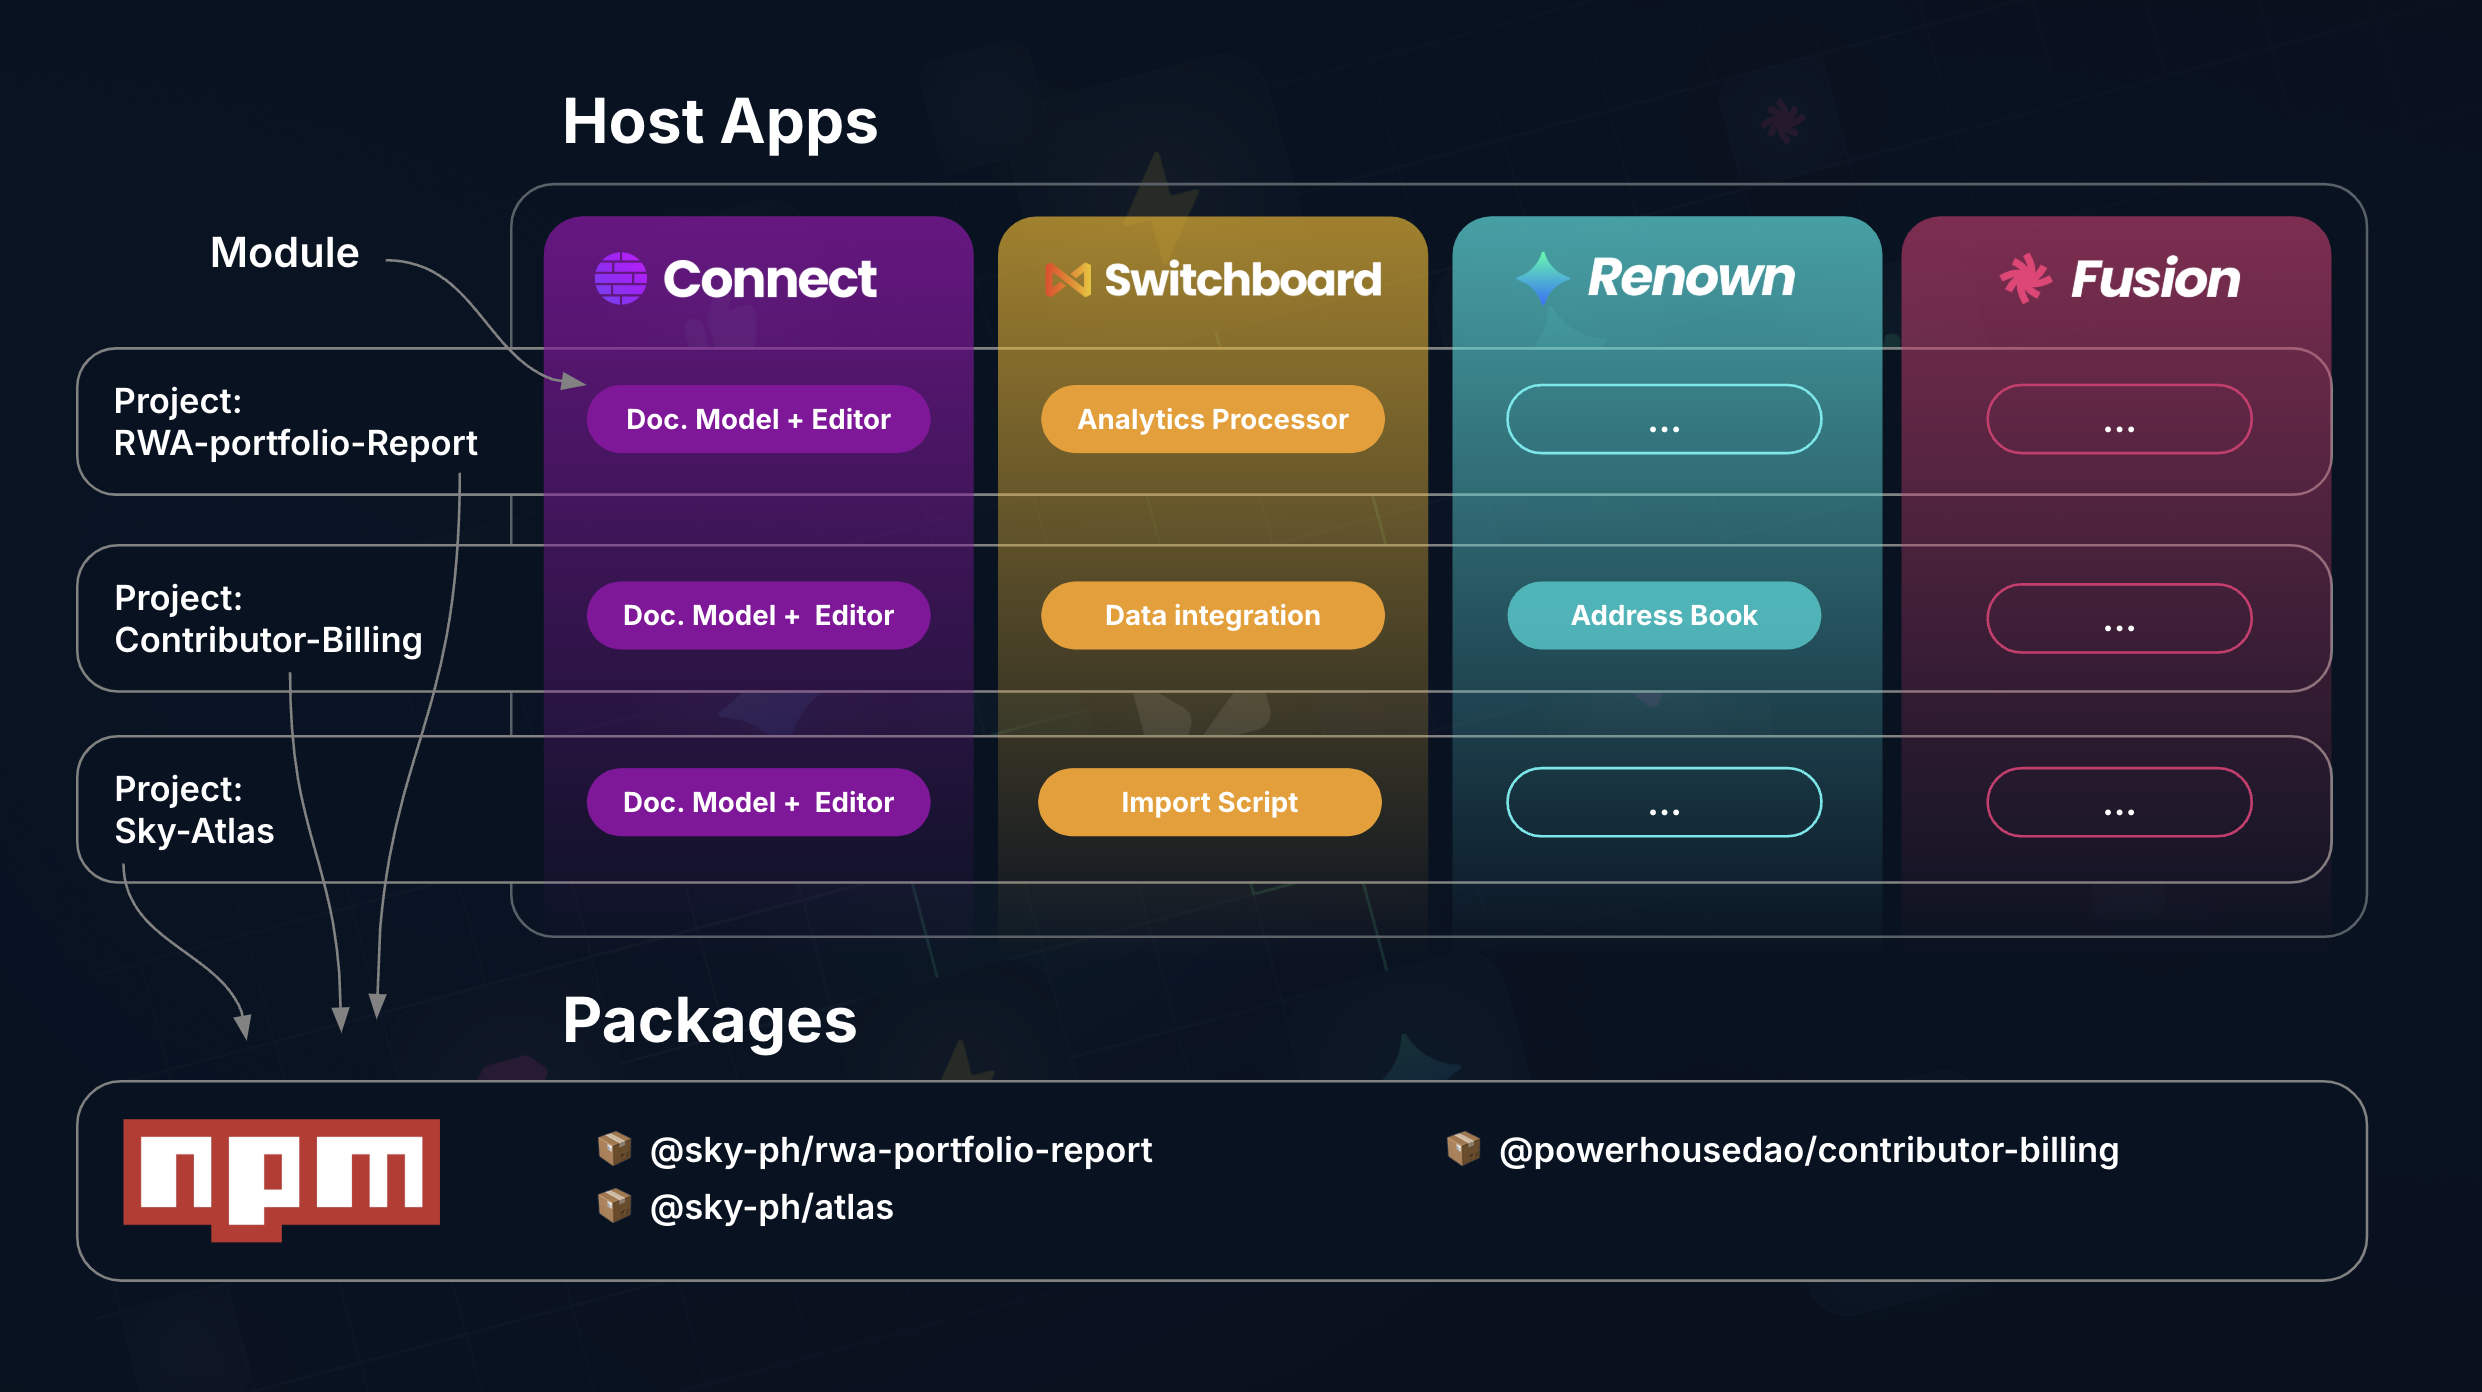
- Powerhouse Package: A collection of modules published to NPM that can be installed on a server instance or locally. Organizations build packages for specific purposes or workflows.
- Powerhouse Modules: The building blocks of your package—document models, editors, processors, or scripts.
- Vetra Studio: The development hub where you assemble specifications for your package. Each module is defined through specification documents that drive code generation.
- Powerhouse Drive-apps: Customized drive interfaces that enhance document functionality and workflows within a drive.
1. Building your project
1.1. Initialize your project
Start by initializing a new Powerhouse project:
ph init
You'll be prompted to name your project, which will become the package name when published to NPM.
Command not working? Did you install ph-cmd?
The Powerhouse CLI (ph-cmd) is a command-line interface tool that provides essential commands for managing Powerhouse projects. Install it globally using:
pnpm install -g ph-cmd
Key commands include:
ph vetra --watchfor launching Vetra Studioph connectfor running Connect locally (alternative)ph switchboardorph reactorfor starting the API serviceph initto start a new projectph helpto get an overview of all available commands
How to use different branches?
When using the Powerhouse CLI, you can access dev & staging branches for experimental features or bugfixes under development.
| Command | Description |
|---|---|
| pnpm install -g ph-cmd | Install latest stable version |
| pnpm install -g ph-cmd@dev | Install development version |
| pnpm install -g ph-cmd@staging | Install staging version |
| ph init | Use latest stable version of the boilerplate |
| ph init --dev | Use development version of the boilerplate |
| ph init --staging | Use staging version of the boilerplate |
| ph use | Switch all dependencies to latest production versions |
| ph use dev | Switch all dependencies to development versions |
| ph use prod | Switch all dependencies to production versions |
Please be aware that these versions can contain bugs and experimental features that aren't fully tested.
1.2. Launch Vetra Studio
Launch Vetra Studio in interactive watch mode for development:
ph vetra --interactive --watch
This mode provides:
- Interactive confirmations before code generation
- Dynamic reloading for document-models and editors
- Live preview of your changes in Vetra Studio
Alternatively: Use Connect
You can also use Connect for local development:
ph connect
This opens Connect in your browser at http://localhost:3000/, providing a local Reactor for testing.
1.3. Configure package details
In Vetra Studio, navigate to the Package Details section of your Vetra Studio drive to configure:
- Package name: Use the format
@your-org-ph/package-name(the-phsuffix identifies Powerhouse ecosystem packages) - Description: A meaningful description of your package
- Keywords: Search terms for discoverability
- Version: Following semantic versioning (e.g.,
1.0.0) - Author and License information
These details are stored in your package.json and a manifest.json file is automatically generated from this configuration.
{
  "name": "@your-org-ph/package-name",
  "version": "1.0.0",
  "author": "Your Name",
  "license": "AGPL-3.0-only",
  "publishConfig": {
    "access": "public"
  }
}
1.4. Build your modules
With Vetra Studio running, build your package modules:
- Document Models: Define your document model specifications in Vetra Studio. The state schema and operations are automatically generated into code.
- Editors: Create editor specifications linked to your document models. Vetra generates the scaffolding code.
- Reducers: Implement the state transition logic in the generated reducer files.
- Unit Tests: Write tests for your reducer logic in the
tests/directory.
Run tests to verify your implementation:
pnpm run test
1.5. Verify your build
Build your project to verify everything compiles correctly:
pnpm build
This creates an optimized build output ready for distribution. Test the build locally:
ph vetra --interactive --watch
Create documents of your defined types and verify all functionality works as expected.
1.6. Store in version control
Initialize a git repository to track changes:
git init
git add .
git commit -m "Initial commit"
2. Publishing your project
2.1. Set up NPM organization
Create an organization on NPM using the naming convention @yourorganization-ph:
- The
-phsuffix identifies Powerhouse ecosystem packages - Example:
@acme-ph
We recommend using a dedicated NPM account for your organization rather than a personal account.
2.2. Log in to NPM
npm login
Follow the prompts in your terminal or browser to authenticate.
2.3. Version your package
Use semantic versioning to update your package version. The pnpm version command will:
- Update the
versioninpackage.json - Create a Git commit for the version change
- Create a Git tag (e.g.,
v1.0.1)
# Patch release (1.0.0 → 1.0.1) - bugfixes
pnpm version patch

# Minor release (1.0.1 → 1.1.0) - new features
pnpm version minor

# Major release (1.1.0 → 2.0.0) - breaking changes
pnpm version major
2.4. Push to Git
Push your commits and version tag to your remote repository:
git push origin main
git push origin vX.Y.Z  # Replace with your actual tag
2.5. Publish to NPM
pnpm publish
For scoped packages intended to be public, ensure your package.json includes the publishConfig shown earlier, or use:
pnpm publish --access public
To publish a pre-release version:
# Ensure your version reflects the pre-release (e.g., 1.1.0-beta.0)
pnpm publish --tag beta
- Git Tags: Markers in your repository history (e.g.,
v1.0.0) created bypnpm version - NPM Dist-Tags: Labels pointing to published versions (
latest,beta,next). When publishing without a tag, the version gets thelatesttag by default.
3. Installing your package
Once published, install your package in any Powerhouse environment:
ph install @your-org-ph/package-name
This makes your document models and editors available within that Powerhouse instance.
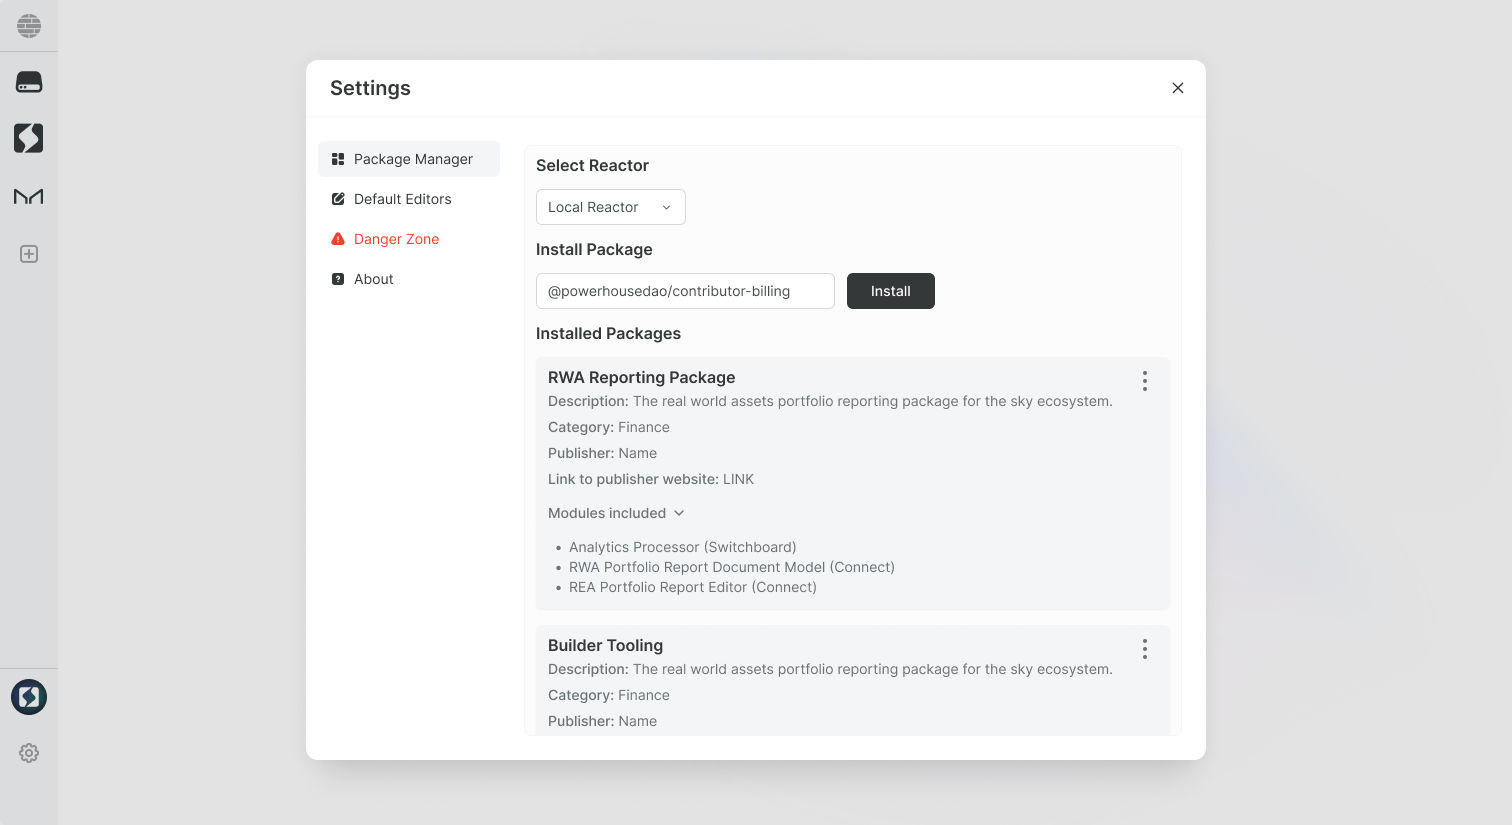
Future: Package Manager UI
A visual package manager is planned for Connect's settings, allowing installation at the click of a button.
Congratulations on publishing your package! Your document models and editors are now available for installation across the Powerhouse ecosystem.