Using the API
Introduction to Switchboard
Switchboard is the API interface that enables developers and data engineers to access data captured through document models in Connect and Fusion.
Once you've structured and captured data from your business processes, Switchboard allows you to leverage that data to build insightful experiences in external websites, create interactive drive widgets, or generate detailed reports and dashboards in Fusion.
Since your document models are defined with a GraphQL schema, you can use the same objects and fields in your queries and mutations to retrieve or write data from and to your documents.
New to GraphQL? Click here for a primer on GraphQL concepts at Powerhouse
GraphQL plays a fundamental role in defining document model data schemas, handling data access patterns, and enabling event-driven workflows within the Powerhouse ecosystem.
More specifically, GraphQL is used as:
- The schema definition language (SDL) for defining our document models and thereby self-documenting the API to the data model. It allows developers to define the structure and relationships of data in a strongly-typed format.
- As the query language in subgraphs, which allow different services to expose and query structured data dynamically.
GraphQL SDL is the backbone of Specification Driven Design & Development at Powerhouse. By defining your document models in SDL, you create machine-readable specifications that serve as a shared language—bridging the gap between developers, designers, and AI agents for precise, iterative collaboration.
Why GraphQL?
- Precision: Instead of over-fetching or under-fetching data, GraphQL enables you to specify the precise data requirements in your query.
- Single Endpoint: With GraphQL, you can access all the data you need through one endpoint, reducing the number of network requests.
- Dynamic Queries: Its introspective nature allows developers to explore the API's schema dynamically, which streamlines development and documentation.
Schema
The schema defines the structure of a GraphQL API. It acts as a contract between the client and server, detailing:
- Data Types: The various types of data that can be queried.
For example the contributor type and the project type - Fields: The available fields on each type.
For example the contributor type has a field 'name' and the project type has a field 'title' - Relationships: How different types relate to each other.
For example the contributor type has a relationship with the project type
type Contributor {
  id: ID!
  name: String!
  reputationScore: Float
  projects: [Project] # The Contributor type has a field 'projects' that returns an array of Project objects
}

type Project {
  id: ID!
  title: String!
  status: String
  budget: Float
}

type Query {
  getContributor(id: ID!): Contributor
}
With the following query someone can request the contributor with the id 123:
query {
  getContributor(id: "123") {
    name
    reputationScore
    projects {      # Accessing the related projects
      title
      status
    }
  }
}
Fields and Arguments
- Field: A specific piece of data you can request from an object. When you build a query, you select the fields you want to retrieve.
- Argument: Key-value pairs that can be attached to fields to customize and refine the query. Some fields require arguments to work correctly, especially when dealing with mutations.
Powerhouse uses invoices as part of its decentralized operations. With GraphQL, an invoice query might look like this. Here, contributorId and status are arguments that filter the results to return only paid invoices for a specific contributor.
query {
  getInvoices(contributorId: "456", status: "PAID") {
    id
    amount
    currency
    dueDate
  }
}
Introspection
GraphQL APIs are self-documenting. Through introspection, you can query the API to retrieve details about its schema, including:
- The list of available types and fields.
- The relationships between those types. This capability is particularly useful for developing dynamic client applications and auto-generating documentation.
Developers might want to see what data structures are available. This makes it easy to explore document models and read models in Powerhouse without needing to consult extensive external documentation.
{
  __schema {
    types {
      name
      fields {
        name
      }
    }
  }
}
Connections, Edges, and Nodes
When dealing with lists of data, GraphQL employs a pattern that includes:
- Connection: A structure that represents a list of related objects.
- Edge: Represents the link between individual nodes (objects) in a connection. Each edge contains:
- A node field (the actual object).
- A cursor for pagination.
- Node: The individual object in the connection. When querying nodes, you continue selecting subfields until all the data resolves to scalar values.
To efficiently fetch invoices in Powerhouse, a paginated query could look like this. This allows Powerhouse Switchboard to efficiently handle large datasets and return results incrementally:
query {
  invoices(first: 10, after: "cursor123") {
    edges {
      node {
        id
        amount
        dueDate
      }
      cursor
    }
    pageInfo {
      hasNextPage
      endCursor
    }
  }
}
Mutations
While queries retrieve data, mutations modify data. In Powerhouse, a contributor might need to submit an invoice after completing a task. A GraphQL mutation for this could be:
mutation {
  submitInvoice(
    input: {
      contributorId: "123"
      amount: 500.00
      currency: "USD"
      dueDate: "2024-03-01"
    }
  ) {
    id
    status
  }
}
GraphQL Subgraphs in Powerhouse
Powerhouse structures its data into subgraphs, which are modular GraphQL services that connect to the Reactor (Powerhouse's core data infrastructure) or Data Stores fueled by data from processors. Each subgraph has its own SDL, ensuring modularity and flexibility while working within the ecosystem.
Fetching data from the Reactor: Powerhouse uses GraphQL to expose system-level data, such as drives, users, and operational records through the System Subgraph, which allows querying of drives, stored files and folders.
Operational data stores: Custom subgraphs can be created to store and retrieve operational data in real time. For example, a subgraph can track file uploads and expose this data via GraphQL queries.
CQRS Architecture with GraphQL
Powerhouse uses CQRS (Command Query Responsibility Segregation) to separate write operations (commands) from read operations (queries). This improves system scalability and flexibility:
- GraphQL Queries handle read operations, retrieving structured data efficiently
- GraphQL Mutations handle write operations, modifying the state in a controlled manner
Powerhouse's subgraphs act as the read layer, while processors handle write operations into operational data stores. This prevents conflicts between querying and modifying data.
| Layer | Role | GraphQL Usage | Implementation |
|---|---|---|---|
| Write Model (Commands) | Handles state changes (adding, modifying, deleting) | GraphQL Mutations | Processor |
| Read Model (Queries) | Optimized for fetching/reading/retrieving data | GraphQL Queries | Subgraph |
For more information about GraphQL fundamentals, visit the Introduction to GraphQL documentation.
Querying a document with the GraphQL API
Starting the reactor locally
In this tutorial, we'll show how to use a GraphQL query to query a document model. We'll continue with the To-do List example from our introduction tutorial, but the process can be applied to any other document model. To make our document model available in the Apollo Studio Sandbox, we'll need to store it on a remote Reactor.
Powerhouse Reactors are the nodes in the network that store documents, resolve conflicts, and rerun operations to verify document event histories. Reactors can be configured for local storage, centralized cloud storage, or a decentralized storage network.
Just as you can run Connect locally in studio mode, you can also run a Reactor locally. Use the following command in the terminal from within your Powerhouse project directory:
ph reactor
To start both Connect and a Reactor locally at the same time in a Powerhouse project, you can use the following command:
ph dev
This will return a URL to access the Reactor.
[Reactor]: ➜ Reactor: http://localhost:4001/d/powerhouse
Adding a remote drive or Reactor to Connect
If the remote drive or Reactor isn't present yet in Connect, you can add it by clicking the (+) 'Create New Drive' button in the Connect drive navigation and using the localhost URL to add a new drive with its underlying reactor. Usually, this is http://localhost:4001/d/powerhouse.
Get access to an organization's drive instances by adding their drive to your Connect Drive navigation tree view with the help of the correct drive URL. Click the (+) 'Create New Drive' to add a public drive. To add a new drive, you'll have to know the correct public URL of the drive. Read more about configuring drives.
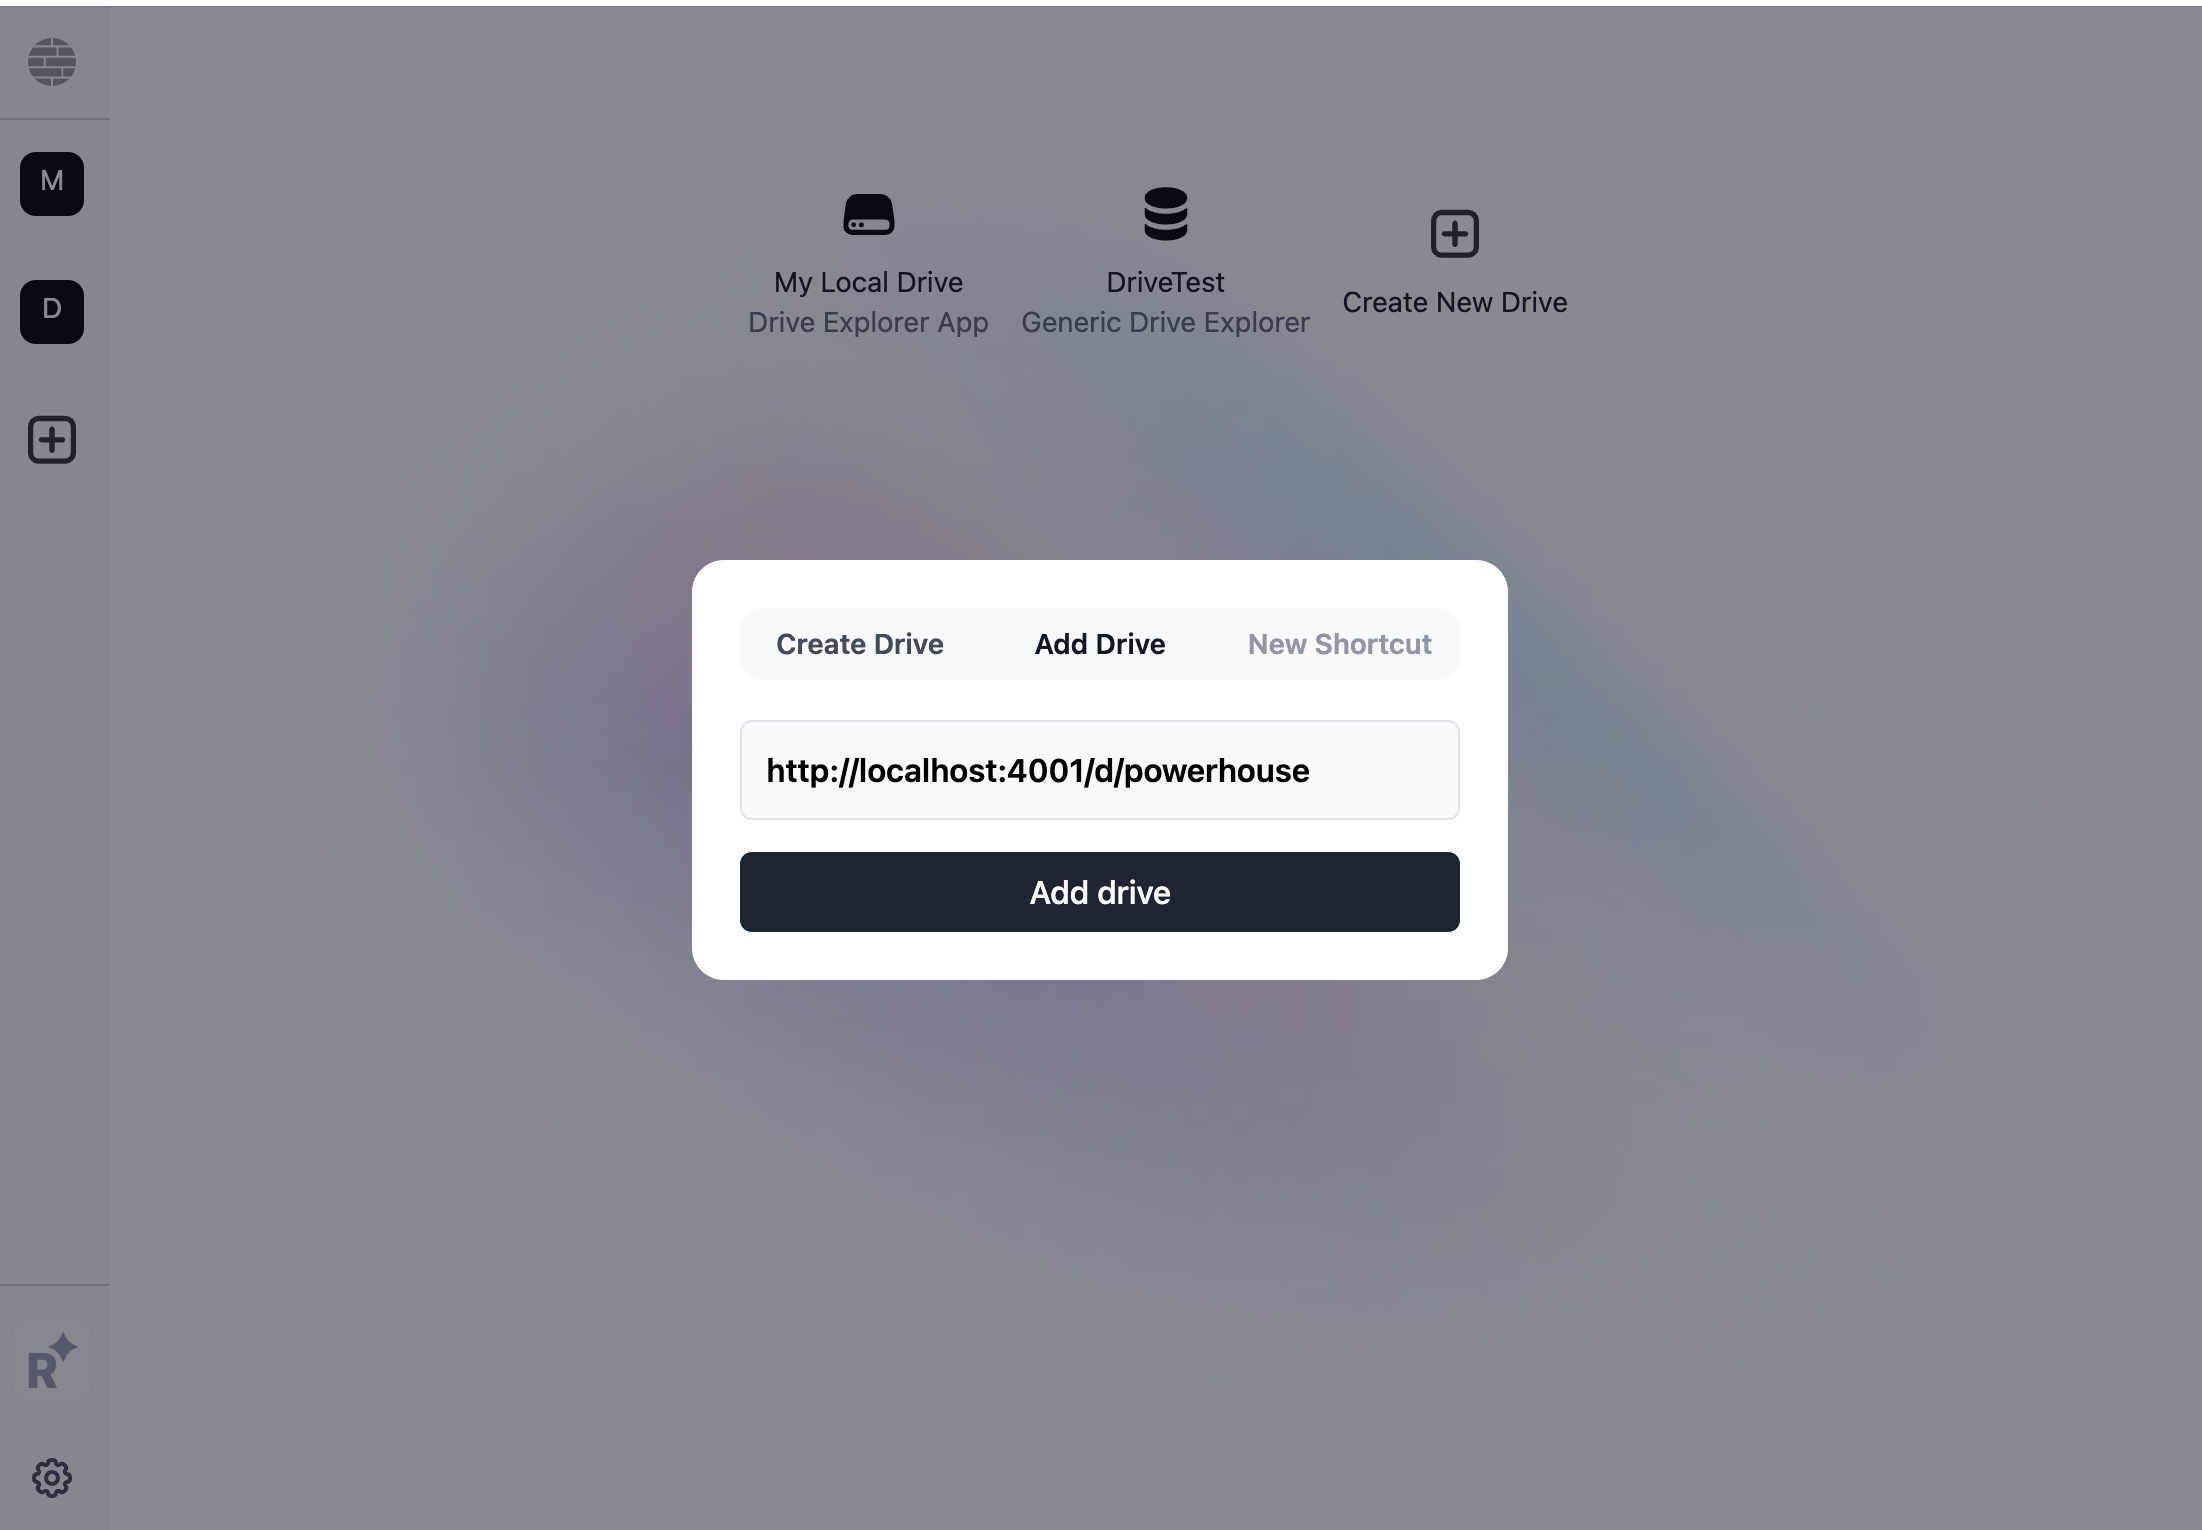
The 'Add Drive' button that allows you to enter a Drive URL.
Query the state of a document
Now that we have our remote reactor and/or drive running, we can store our document model on it. Let's quickly create a new to-do list document in Connect Studio to test the process. Let's call it 'Powerhouse-onboarding-tasks'.
Add the following to-dos to your list:
- Sign up for Powerhouse
- Do the work
- Deliver the work
- Send the invoice
- Get paid
Below is the operation history of the to-do list document. As you can see, the operations are logged in the order they were executed.
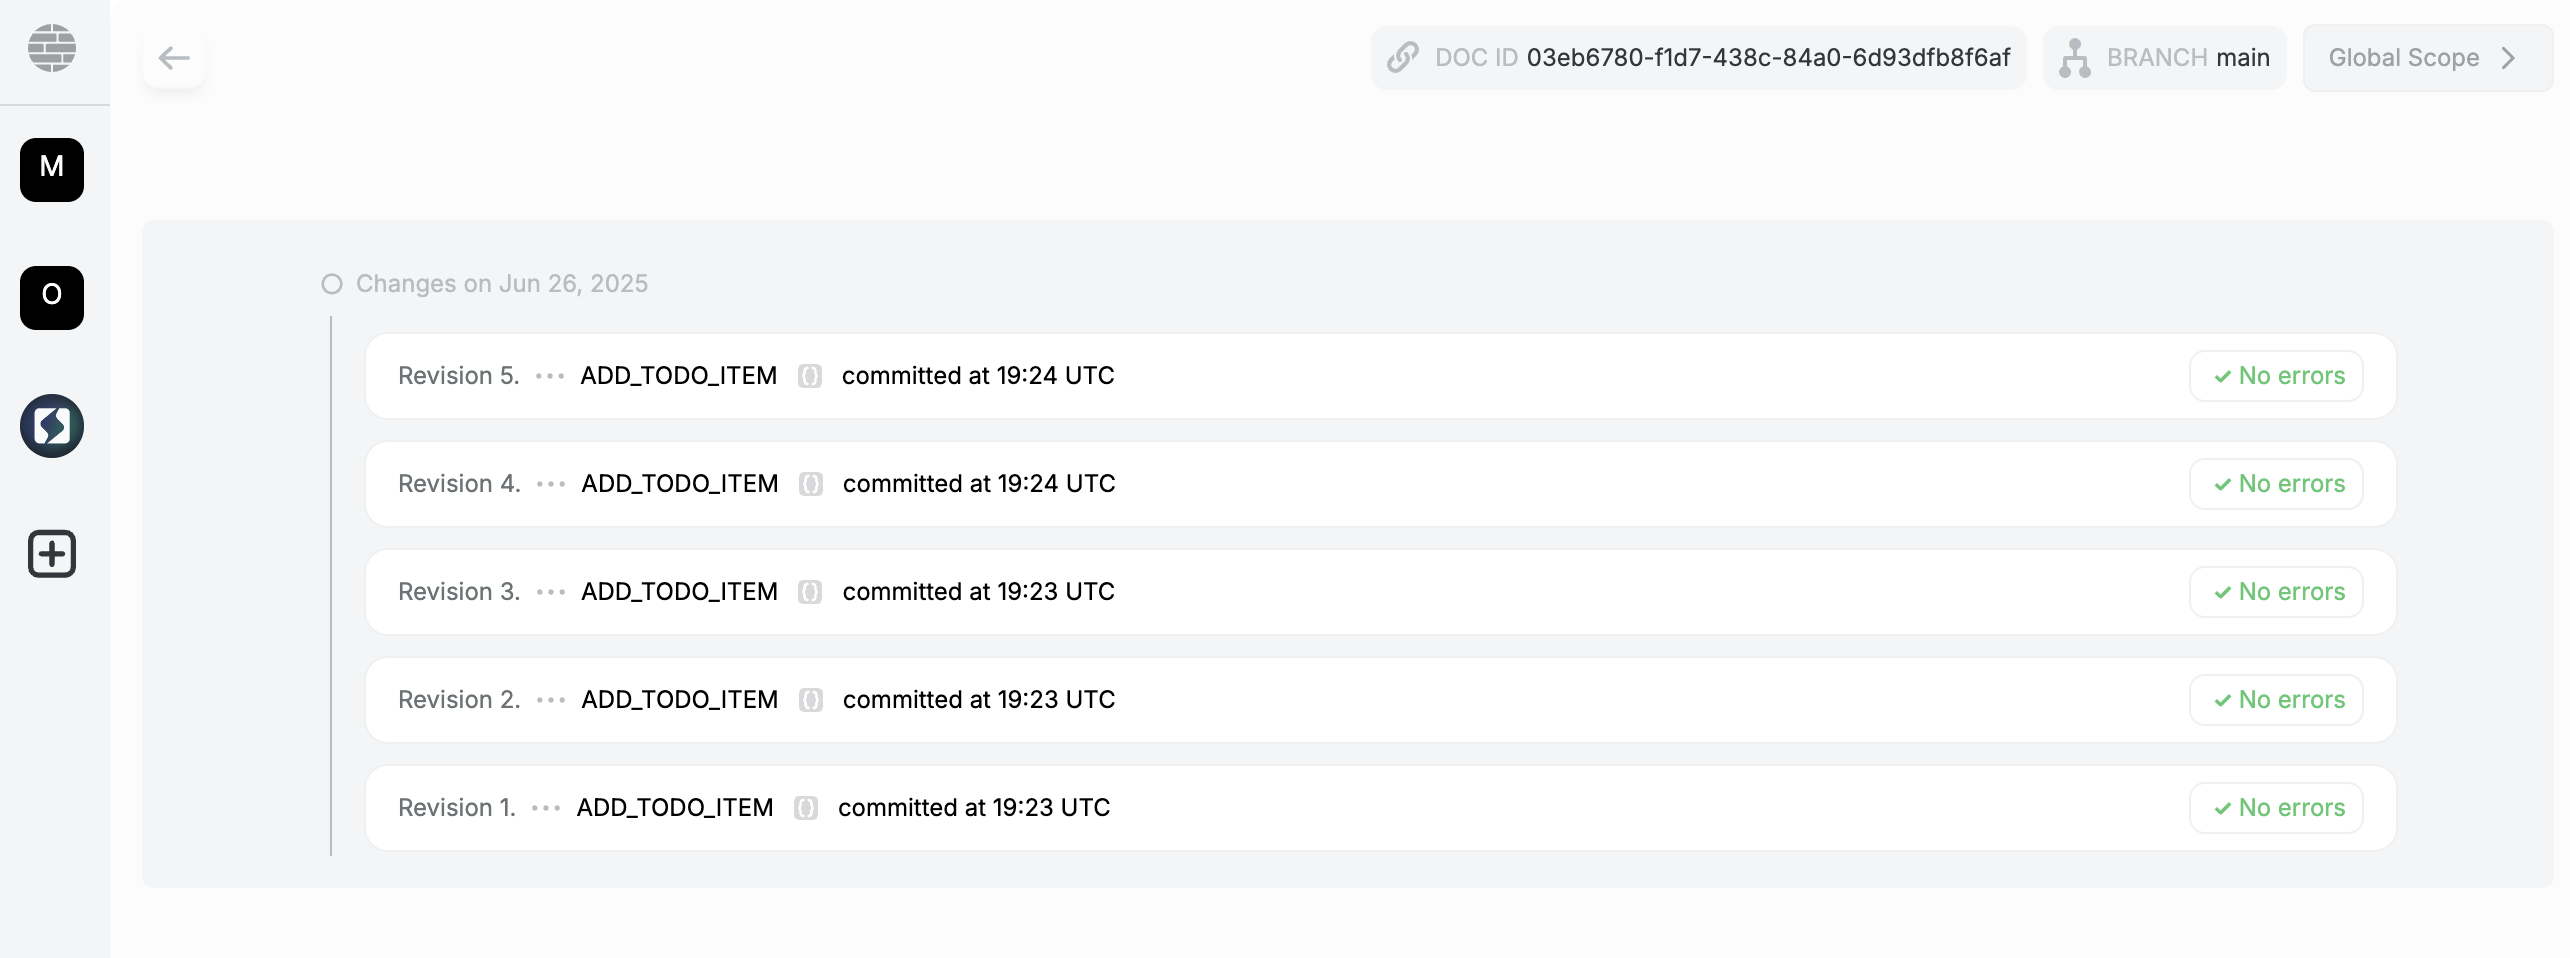
The operation history of the to-do list document, showing each change made.
Now that we have some data in our document model, we can query it through the GraphQL API.
Option 1: Query your document via the Switchboard API Button.
Whenever you want to start a query from a document within Connect, you can open Switchboard by clicking the Switchboard icon in the top right-hand corner of the document editor interface. The Switchboard API button at the top of your document model will get you the complete state of your current document. This will prepopulate the Apollo Studio Sandbox with the correct DocumentID for your document model.

The Switchboard button provides a direct link to the GraphQL API for the document.
Option 2: Query your document by document ID
In your Document Toolbar, you will find an icon to visit your operations history. At the top of the toolbar, you will find your document ID. Copy this ID to use it in the Switchboard API.

You can copy your Document ID from your operations history.
When you navigate to your Switchboard endpoint by adding /graphql/system to the end of your URL. (e.g., http://localhost:4001/graphql/system, https://switchboard.phd/graphql/system, or add it to a custom domain), you can use this document ID to query the state of your document.
The documentation on the left-hand side of the Apollo Sandbox will show you all the different fields that are available to query.
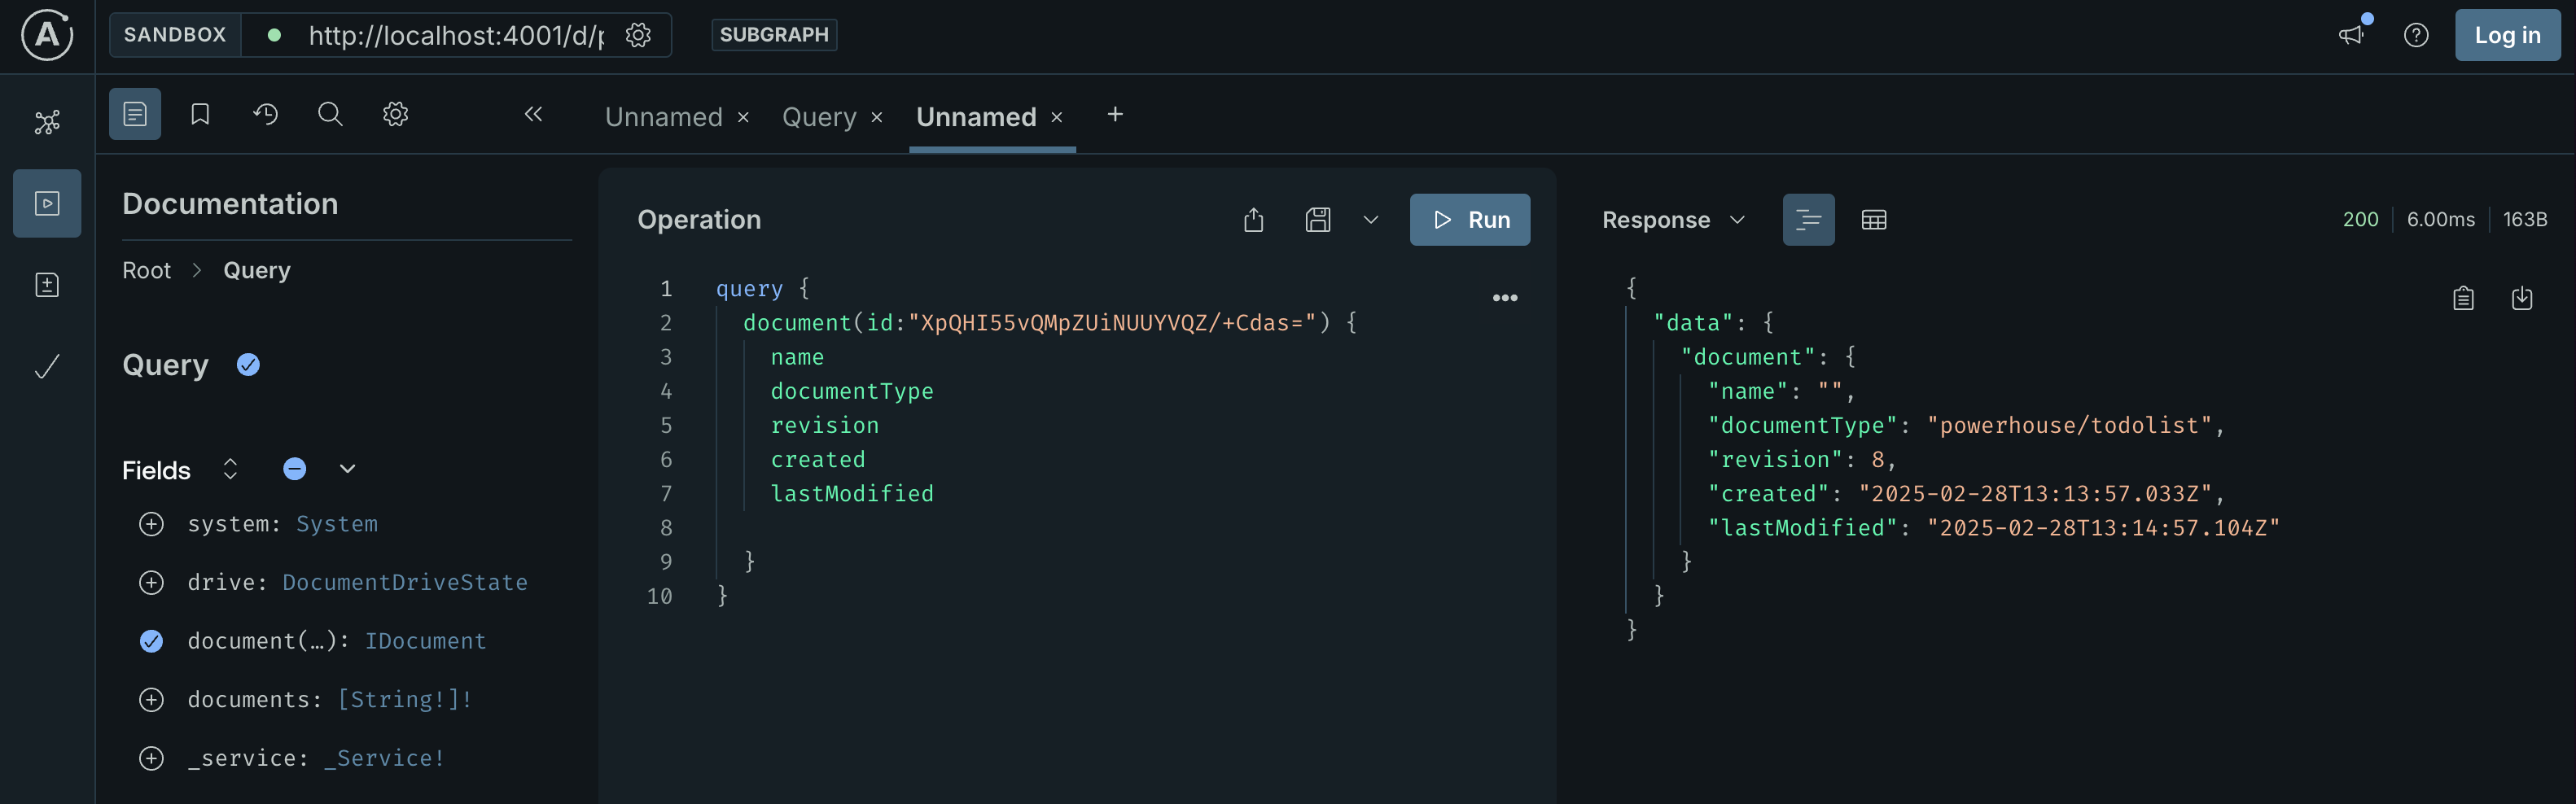
The Apollo Studio Sandbox showing the available fields for querying a document.
Option 3: Search for your document ID via GraphQL
Alternatively, we can use our Reactor URL and endpoint to figure out the document ID. e.g., http://localhost:4001/graphql/system, https://switchboard.phd/graphql/system or your custom https://switchboard.domain/graphql/system
We can find out the ID of our document by querying the drive for its documents. Since we only have one document in our drive, this query will return the ID of our to-do list document.
query Query {
  ToDoList {
    getDocuments {
      id
      name
      documentType
      revision
      created
      lastModified
    }
  }
}
This example query is structured to request all documents of type ToDoList from the drive.
It extracts common metadata fields such as id, name, documentType, revision, created, and lastModified.
Get the state of the document
Once you've found your document via any of the three options above, you'll be able to query its state.
In the previous step, we queried for document metadata. Now let's query for the actual content of the document state.
query getDocument($documentId: PHID!, $driveId: String) {
  ToDoList {
    getDocument(docId: $documentId, driveId: $driveId) {
      id
      created
      lastModified
      name
      revision
      state {
        items {
          id
          text
          checked
        }
        stats {
          total
          checked
          unchecked
        }
      }
    }
  }
}
{
  "documentId": "03eb6780-f1d7-438c-84a0-6d93dfb8f6af", // or replace this with your specific doc ID
  "driveId": "powerhouse" // or replace this with your specific driveId
}
This query will return the current state of the document, including all to-do items and stats.
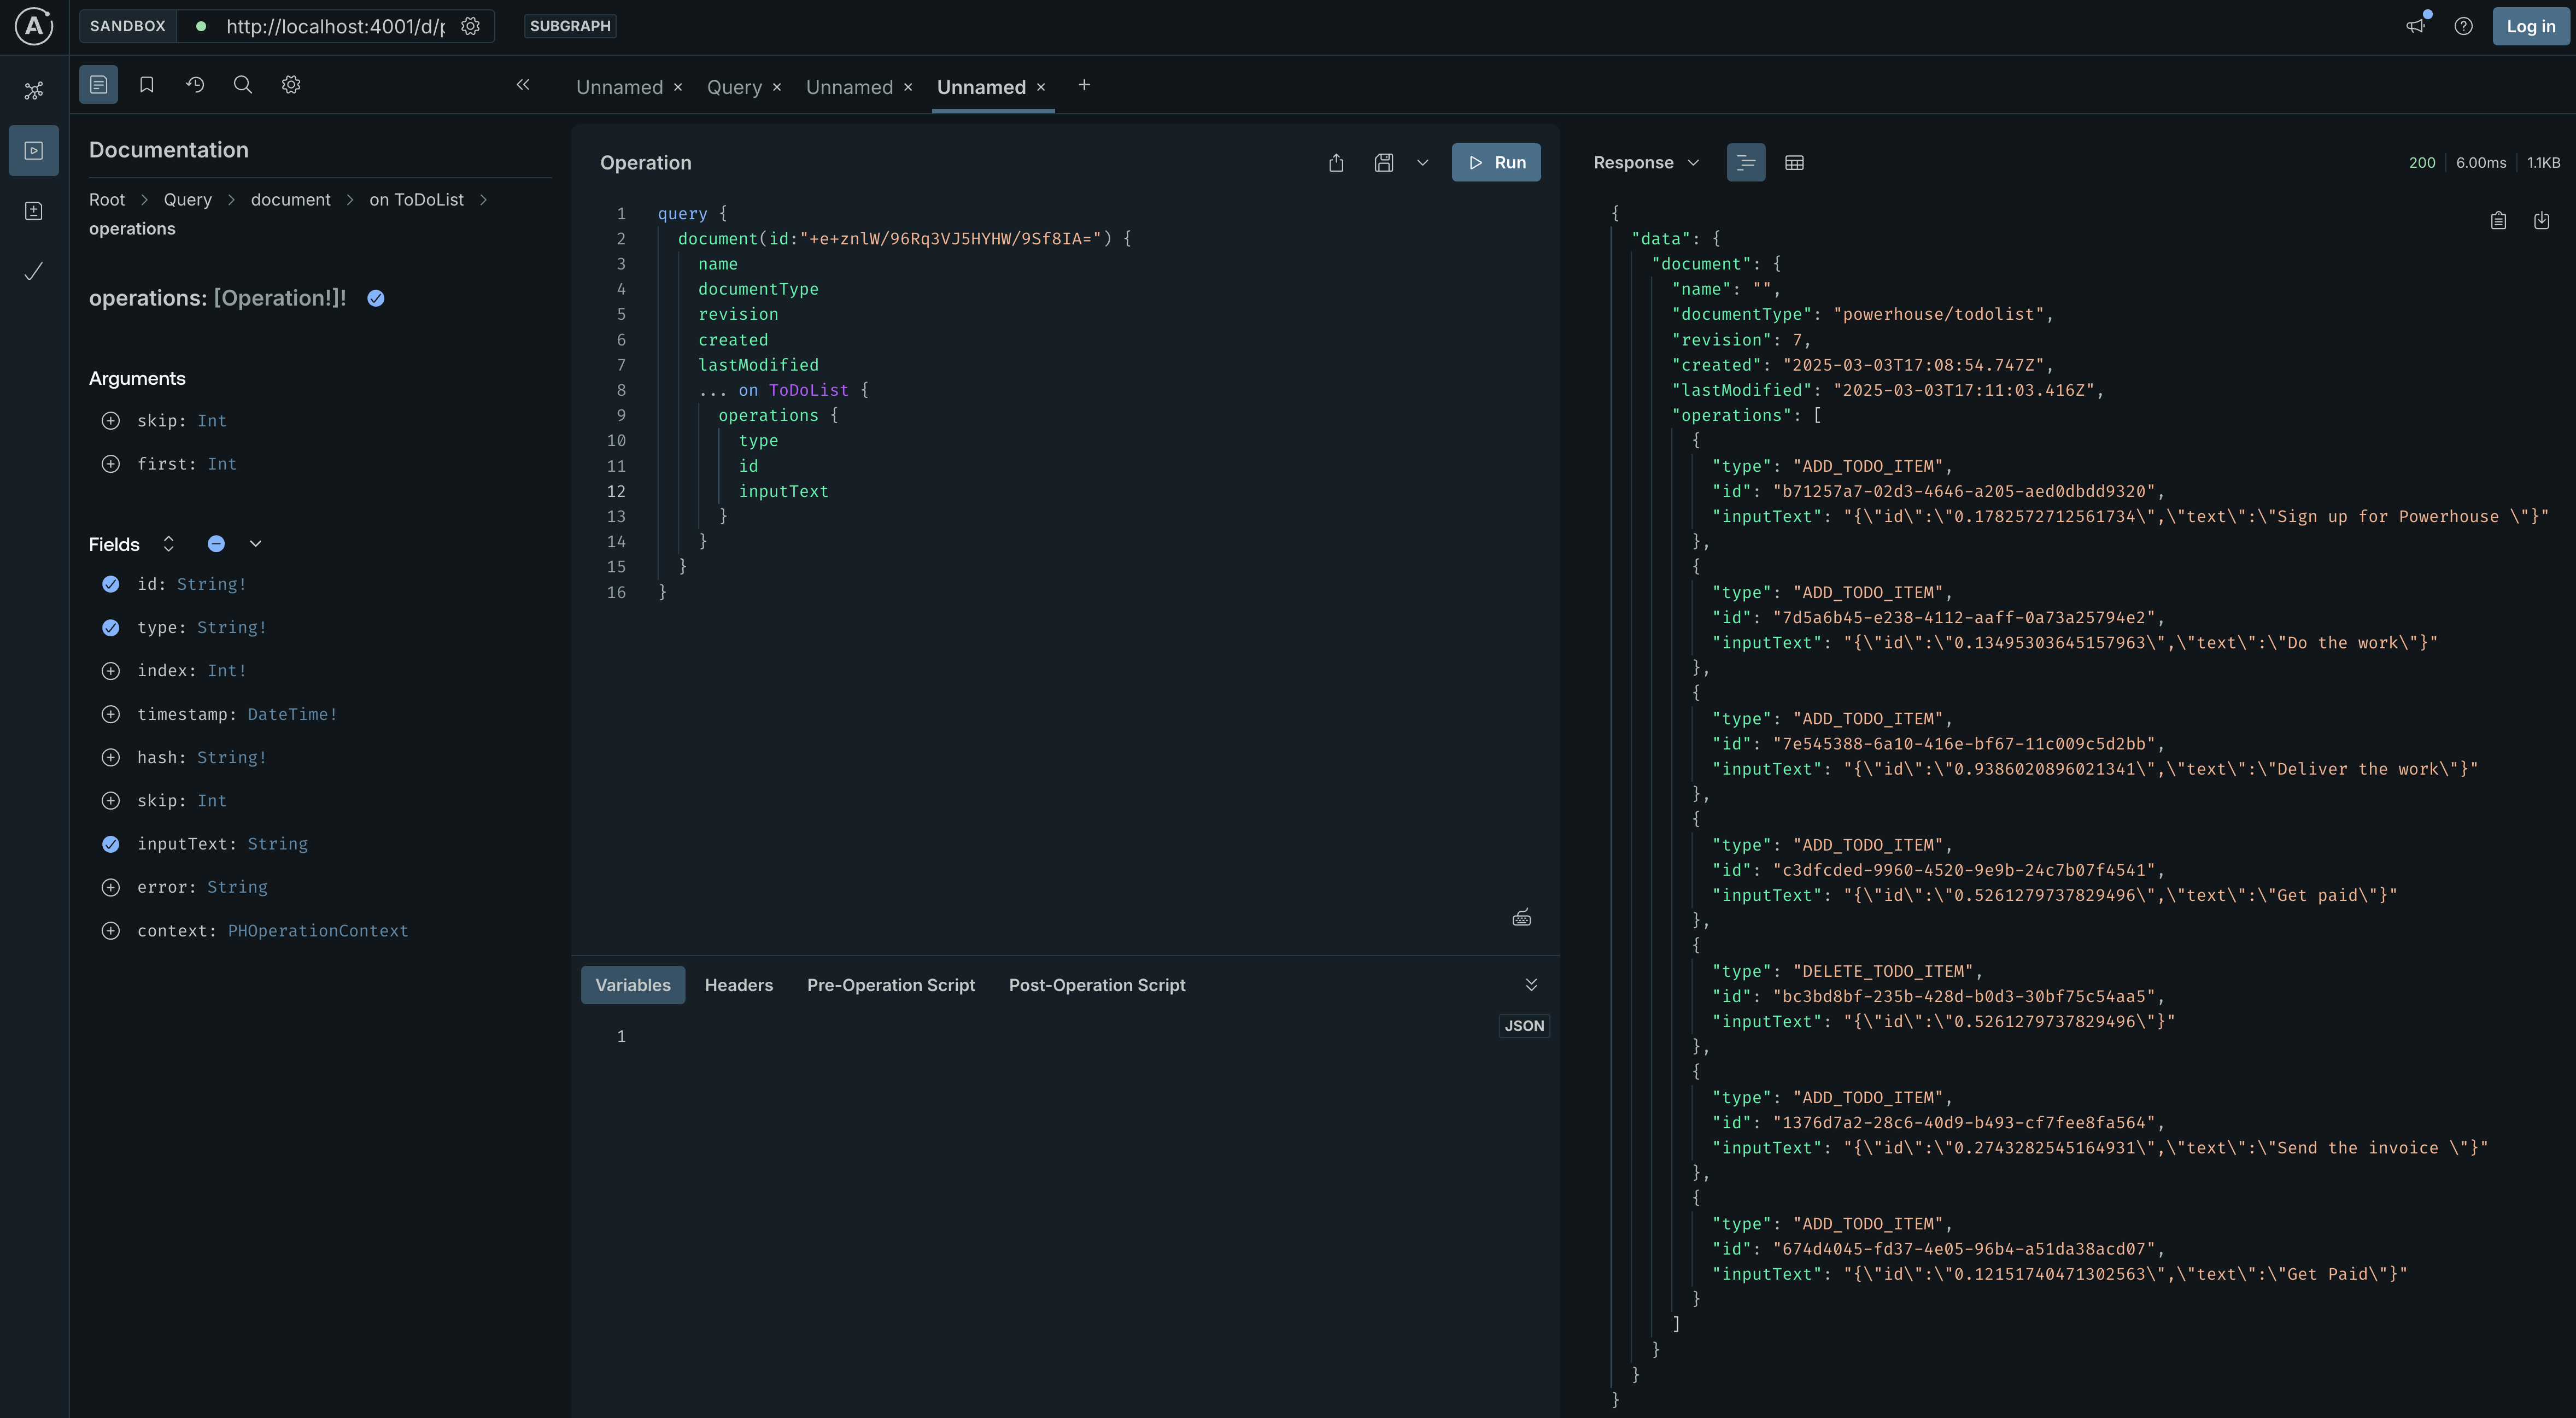
The Apollo Studio Sandbox showing the addTodoItem mutation. You
can see the variables passed in and the response from the server.
Mutate the state of a document
Now that we know how to query the state of a document, we can start to write to it.
To perform write operations, we use GraphQL Mutations. Mutations are similar to queries, but they are used to create, update, or delete data. For our To-do List, we'll want to add, check, and remove items.
Adding a new to-do item
Let's start by adding a new item to our list. The document model for our to-do list has an ADD_TODO_ITEM operation, which translates to an addTodoItem mutation in GraphQL.
To use this mutation, you need to provide the docId of the to-do list you want to modify, and the text and id for the new to-do item. We'll specify these via variables.
Here is an example of how to structure the mutation:
mutation Mutation($docId: PHID, $input: ToDoList_AddTodoItemInput) {
  ToDoList_addTodoItem(docId: $docId, input: $input)
}
{
  "docId": "03eb6780-f1d7-438c-84a0-6d93dfb8f6af",
  "input": {
    "text": "My new to-do from GraphQL",
    "id": "1"
  }
}
Replace the example docId with the actual ID of your document. You can get this ID by querying the drive as we did before.
When you execute this mutation in Apollo Studio, it will add the new item to your to-do list. The response will return the number of to-do's on your list.
Deleting a to-do item
To delete an item, you'll need its unique identifier. When you query for the to-do items in your list, each one will have an id. You'll use this id to specify which item to delete.
The document model provides a DELETE_TODO_ITEM operation, which corresponds to a deleteTodoItem mutation.
Here's how you can use it:
mutation Mutation($docId: PHID, $input: ToDoList_DeleteTodoItemInput) {
  ToDoList_deleteTodoItem(docId: $docId, input: $input)
}
{
  "docId": "03eb6780-f1d7-438c-84a0-6d93dfb8f6af",
  "input": {
    "id": "0.6325811781889789"
  }
}
Make sure to replace the docId and id with the appropriate values for your document and the item you wish to delete.
After executing this mutation, the specified to-do item will be removed from your list.
Verifying the changes
After performing a write mutation, you can verify that the change was successful in a couple of ways:
- Query the document state again: Rerun the
getDocumentquery from earlier in this tutorial. You should see the new item in the list or the deleted item removed. - Check the Operation History: The operation history in Connect will show the new
ADD_TODO_ITEMorDELETE_TODO_ITEMoperation, along with who performed it and when. This provides a complete audit trail of all changes to the document.
Summary
This ability to programmatically read from and write to documents via the GraphQL API is a powerful feature of Powerhouse. It unlocks countless possibilities for integrating your structured data into other applications, building automated workflows, and creating rich, data-driven user experiences.